Watch Spatial Videos on Meta Quest: Detailed Guide & Samples

Update from February 27, 2024:
Meta introduced official Spatial Video support with system update v62. Meta's approach is cloud-based and does not make the method described in this article obsolete. In a separate article, I go hands-on and discuss the pros and cons of Meta's solution.
Spatial photos and videos look great on Meta Quest. I'll explain step by step how to transfer them and view them on your Quest.
I recently got an iPhone 15 Pro and wanted to find out the quickest and easiest way to transfer and view my own Spatial videos with Meta Quest 3. Once set up, the process takes less than a minute with the following guide.
Content
What are Spatial videos?
With Apple Vision Pro and the iPhone 15 Pro (Max), you can record so-called Spatial videos.
Spatial videos are stereoscopic footage in rectangular format and a resolution of 1,920 x 1,080 pixels per eye. They are spatial in the sense that they convey an impression of depth. Please note: Spatial videos are neither 180-degree or 360-degree recordings (3DoF) nor volumetric (6DoF).
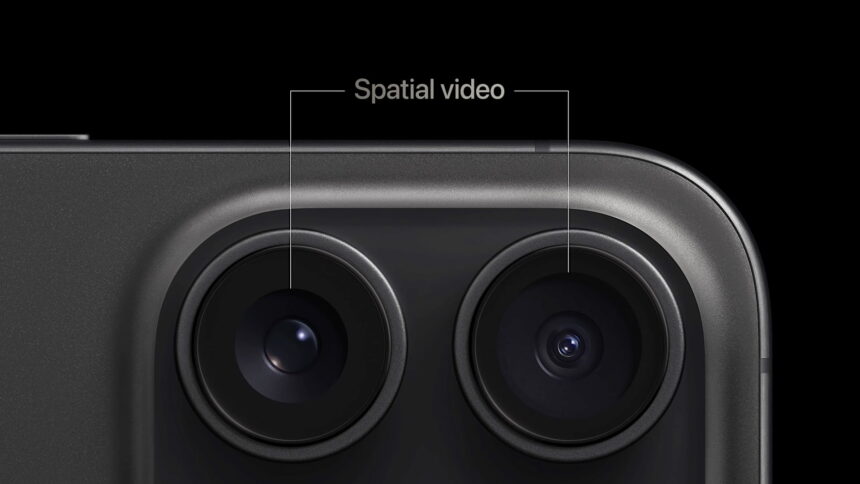
The main and ultra-wide cameras are used for Spatial videos, so the iPhone must be held horizontally when filming. | Image: Apple
Apple Vision Pro will cost $3,500 and will be available in the United States starting February 2, 2024. If you have an iPhone 15 Pro and a Meta Quest (starting at $250), you can already shoot and view Spatial videos without Vision Pro.
Guide: Record Spatial videos and watch them on Meta Quest
Step 1: Record Spatial videos with iPhone 15 Pro
First activate this video capture mode in the settings of your iPhone 15 Pro under Settings > Camera > Formats. There, turn on "Spatial Video for Apple Vision Pro".
Switch to the camera's video mode and tap the Vision Pro icon to capture a Spatial video. You must hold the phone in landscape orientation while recording.
I recommend choosing motifs with multiple levels of depth. Very close objects look particularly impressive, while open landscape shots have little spatial effect. Try to keep the smartphone as steady as possible and use a tripod if necessary. I wouldn't move the camera while recording, as this type of footage can make you nauseous when watching on the headset.
Step 2: Convert Spatial videos for Meta Quest
In order to view the Spatial videos on Meta Quest, you will need to convert them to a compatible video format.
You can do this with the iOS app Spatialify, which is no longer free and costs $2.99. However, it is worth the money as the app is under active development and is getting more and more features. I do not know of any free alternatives that work as easily.
In the app, go to "Browse Spatial Album" and select the video you want to convert. Tap the Share icon, select "Full Side-by-Side", and then tap "Export".
Tip: If you want to convert and transfer multiple videos at once, select "Batch Export from Spatial Media" in the main menu, tap the "+" sign, select "Select from Spatial Album" and then select the videos you want to convert.
Step 3: Transferring Spatial videos to Meta Quest
The easiest transfer option I have found is via Dropbox or another service of this type. Dropbox Basic is free and offers 2 GB of storage. Install Dropbox on your iPhone, register and you're good to go.
Once you tap Export (see previous step), you can upload the converted spatial video to Dropbox. To do this, select the "Save to Dropbox" option and a folder in your Dropbox.
Next, open Meta Quest Browser and sign in to your Dropbox account. Meta Quest Browser can remember your credentials so you don't have to re-enter them every time you close the tab.
Access the folder and download the Spatial Video to your Meta Quest. One disadvantage of Dropbox is that you can only download files one at a time. If you download several at once, they are downloaded as a ZIP file and are useless.
Step 4: Watch Spatial videos on Meta Quest
I recommend using the free DeoVR app to watch the Spatial video.
Click the folder icon in the app and then click the "Download" folder. You should now be able to see and click on the spatial video. Select "Flat" and "SidebySide" as the output format.
Use the right thumb stick to adjust the size of the image and adjust factors such as contrast, brightness, saturation and sharpness in the settings window.
Additional tip: How to take and view Spatial Photos on Meta Quest
Apple's Camera app currently only supports taking Spatial videos, not Spatial photos.
If you still want to take spatial photos, you can do so with Spatialify. I highly recommend it because Spatial Photos look even sharper and more impressive than Spatial Videos.
This is how it works: Tap the camera icon in the top-right corner of the Spatialify main menu. You can then take a spatial photo. You will find the file ready for export in the Spatial Album, where all the spatial footage is stored.
To view the Spatial photos, I recommend the VR app immerGallery or the free version immerGallery Demo. In the app, go to "Local Gallery" and then "Download" to find the photos.
Samples of Spatial Videos and Spatial Photos
I have created a Dropbox link with my own samples of Spatial videos and photos.
Open this article in the Meta Quest browser, click on the link and follow steps 3 and 4. I will upload more samples in the coming days and weeks.
Alternatively, you can watch a sample video by VR content creator and Youtuber Hugh Hou.
Note: Links to online stores in articles can be so-called affiliate links. If you buy through this link, MIXED receives a commission from the provider. For you the price does not change.